PenTest+ : The Microsoft Windows Operating System
PenTest+ : The Microsoft Windows Operating System
What is Windows?
Microsoft Windows (usually referred to as simply 'Windows') is an operating system developed by Microsoft. Microsoft Windows is a graphical operating system, meaning is has a GUI (Graphical User Interface). The earliest version of Microsoft Windows was simply a graphical shell added on top of the existing Microsoft DOS operating system, which up until then had been purely text based.
Windows Desktop
As of the time of writing, the most current version of Windows is known as Windows 10. This is the version of Windows we will be focusing on in this module. Windows on the desktop enjoys a majority market share, due mainly to its ease of use, particularly in the earlier versions of the operating system. In addition, ubiquitous use in business settings means around 90% of all desktop computers run one version of Microsoft Windows or another.
Windows Server
Although Microsoft Windows is best known as a desktop operating system, there are many different versions which are specialised for different uses. Microsoft Windows Server is, as the name suggests, an operating system designed to run on servers. It is set up to allow administrators to easily set up file sharing, email and other such functionality. The reason Windows Server is so common in enterprise settings, however, is mostly down to Active Directory. Active Directory is a system that allows the server to communicate with Windows desktops, allowing the administrator to easily configure all the connected desktops from one location, amongst other uses which we will cover in future modules.
Windows Server does also have a GUI (Graphical User Interface), however there is a version that strips out most of the interface. This has only been possible in the most recent versions of Windows Server because of PowerShell, an incredibly powerful command line (text based) interface. This version of Windows Server is known as Windows Server Core.
Windows IoT (Embedded)
Windows IoT (Internet of Things), formerly known as Windows Embedded is a version of Windows designed to be run on low power computers, such as those found in point of sale systems (tills), digital billboards, cash points, and so on.
Windows on Mobile Devices
Windows can even be found on mobile devices. Although the old Windows Phone operating system has now been retired, the current operating system for mobile devices such as phones and tablets is a version of Windows 10, albeit one that has been customised for use on mobile devices.
XBox
You might be surprised to discover that the XBox One games console also runs a version of Windows 10. Although this version of Windows 10 is heavily customised, its core remains the same as the operating system you use on desktop computers.
Windows Defender
Windows Defender is the built in anti-virus solution that comes with Windows 10. It is enabled by default, and it will also update itself with the latest virus definitions periodically. Microsoft advises that you stick with it, instead of installing third party antivirus solutions, however other solutions might provide more enterprise management capabilities, or features that you need for your particular security setup. What is important is that it provides robust malicious code prevention capabilities out of the box. Microsoft are improving it all the time too, for example in response to ransomware which has been prolific in the past few years.
Windows Defender can be disabled. However, Windows will automatically turn it back on after a period of time. If you install a third party anti-virus product, Windows Defender will be disabled automatically, and it won't turn back on until your third party anti-virus has been uninstalled. Windows does this because running multiple antivirus products at once can cause unexpected behaviour in the computer. You can chain together multiple AV products if you want to in later versions of Windows, but the gains of doing this against performance are minimal. This makes it a rare use case.
To access the settings for Windows Defender, go to the 'Windows' icon in the taskbar and click on it, then type 'defender'. You should see 'Windows Defender Security Centre' in the search results. Windows Defender can be configured from that location.
It is an incredibly thorough tool, and it has access to the system that no other antivirus is even allowed. It certainly has an easy chance of becoming the monopoly figure as it can snoop through all created files and folders, all downloaded files, zip files and even if that file were to be password protected, as soon as it gets opened the chain of processes in Windows feeds it through defender as soon as the calls are made to open a folder - and so it gets checked and dealt with one step later in the perimeter.
Windows Defender also combines and shares file signatures that have been deemed vulnerable with the cloud, and this acts as a massive database centre of signatures, and it can be added to that - then , say every month , the Defender pulls from this cloud database all the work done by other machines across the world to identify new threats on the front-lines.
Windows Firewall
In addition to Windows Defender, Windows 10 has a built in software firewall which is also enabled by default. The firewall will try to prevent unknown connections from coming into your computer from the internet, and for each program that runs, and tries to connect out to the internet, it will also ask you permission to allow it through the firewall. This only happens the first time the program runs, and your signature is now saved in the table after that.
Registry
The Windows Registry is a database of settings for both the operating system and for any applications which support storing data in the registry. The settings here are low-level and are not meant to be changed or even seen by the typical end user. However, the registry is incredibly powerful. There are settings stored in the registry that cannot be modified through any other method.
You should not edit the registry without being confident of what you are doing. It is possible to destroy your Windows installation with a single error. You can also export the registry as a backup, however if you mess up too badly there is no guarantee you could restore the registry using the exported file. At that point, your only option would be a full re-install of the operating system.
To view the registry, we need to use a tool called regedit, which is installed on Windows by default. To access it, click the 'Windows' icon in the taskbar and type regedit.
As we open the editor we are greeted by what are the called the five "root keys" - which store configurations for various different aspects of the system:
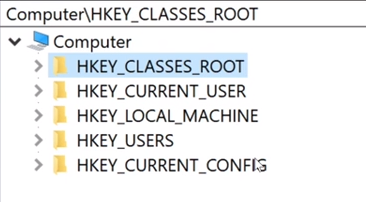
HKEY_LOCAL_MACHINEis the most common root key to be edited by users and administrators - due to the fact it contains computer-specific information about the hardware installed, software settings, and other information. The information is used for all users who log on to that computer. This key, and its sub-keys, are one of the most frequently areas of the registry viewed and edited by users.HKEY_CURRENT_USER. Stores data on the current user that's logged in, so the root key gets populated on login.HKEY_USERS. Contains information about all the users who log on to the computer, including both generic and user-specific information.HKEY_CURRENT_CONFIG. The details about the current configuration of hardware attached to the computer.HKEY_CLASSES_ROOT. Describes fundamental operations and function calls that programs are most likely to make, so it describes things like file type, file extension, and OLE information.
Root keys like these five , plus a few others - are called the main "hives" of data.
The stereotypical location for where malware is added to the registry is in:
HKEY_LOCAL_MACHINE\Software\Microsoft\Windows\CurrentVersion\Run
But AV has long since been watching this directory heavily, so its up to us to find more nuanced avenues.
Keep regedit open and scroll until you get here:
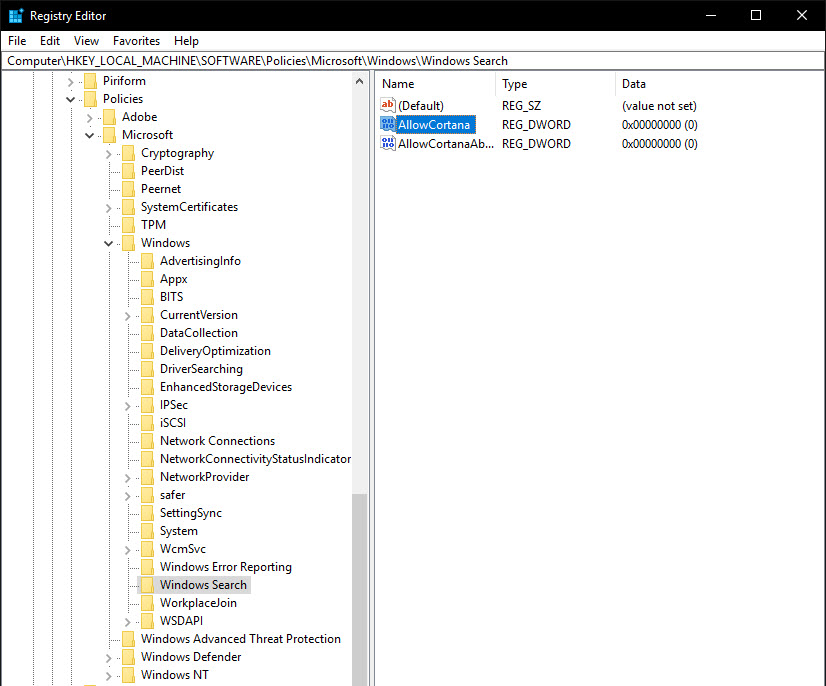
This entry highlighted is one I made, which is what will allow us to configure the settings for Cortana : The place to add this value, and what it should be called - in this case the convention has to be Allow** which is the verb denoting the action, and then the program name. The type of data associated with this key is DWORD standing for a 32-bit string, though in this case we could've used binary as all we want to do is set the data to 0 - saying we want the setting off.
Restart the computer and you shouldn't be greeted by any assistants.
Log Files
Like most operating systems, Windows keeps a 'log' of events that occur on the computer. Log files are useful in many circumstances, from determining what was responsible for a crash occurring, to trying to trace if an attacker has compromised the system.
To view the log files, we can use the Event Viewer. The Event Viewer can be accessed by going to the 'Windows' icon in the taskbar, and then typing 'event viewer'. One of the search results should be 'Event Viewer'. Click on it to open, and you should be presented with a window that looks like this:

From here, you can expand the 'Windows Logs' folder and pick a log file to examine:

Here is an example of the 'Security' log, where we can see a 'logon' event.
This is an immensely powerful tool for an administrator, as maybe you can find out who has logged on, what servers they accessed, are they making outbound connections etc.
User Accounts, Groups and Permissions
A user account is what you use to sign in to your computer. Seems simple, right? Several accounts are created automatically during installation so we'll have a look at those, before looking at how to create and manage users on your machine; on the other hand are service accounts, which are accounts which manage things like mysql and other things which need processing, and need to stay confidential. Since no user would ever need these details there are service accounts which manage upkeep and are used in scheduling jobs that use the service - making it much more secure and streamlined.
Default Accounts
Along with any user you specify during installation, the following users are always created when you install Windows:
- Administrator: This account has 'full' control over the machine. There are some things it can't do (generally something that would break the operating system), but it can be used to manage other users and install applications.
- Guest: The Guest account is used by people who do not have an actual account on the computer. It is limited in what it can do, and care should be taken to ensure that this account is not able to do anything that could cause harm.
- Default Account: This is used as the template for all new accounts created on the machine. Any changes made to this account will be carried over.
All three of the accounts will be disabled by default, which means you can't log in using them. But they're there and can be enabled if you need.
Account Types
Windows 10 has three account types (it's actually closer to two as you'll see shortly): Administrator, Standard and Child - I don't mean child as in class hierarchies , I mean an account for children.
The Administrator account type is able to make changes that affect all users, including modifying other accounts, installing applications and changing security settings on the machine.
A user with the Standard account type can do most things that an Administrator can, however their scope is reduced; they can't delete certain files or change things that affect everyone.
The third type, Child, is effectively the Standard account with parental controls that reduce scope and power, enabled automatically so things like usage time can be monitored or limited. It can only be created as part of a family, it's not possible to create a Child type by any other method.
Making an account
The easy way would be to do Control Panel -> Accounts -> Add someone else to this PC. But there is a more powerful way using the local user manager or lusrmgr.msc program.
If you hit 'Start' and type lusrmgr.msc you'll see the console suggested. It'll look like this:

Once it's loaded we can select Users and we shall see on the current accounts on the system, where hackers who make nefarious accounts will be spotted.
Creating a user from this screen is as simple as right-clicking and selecting 'New User'. This this will then display the following screen:
From there we can right click on this list and hit New User granting us the following menu:

You'll notice that this screen gives us a lot more choice when creating the account. We can force the user to change their password when they log in for the first time, make it so they can never change their password, or create the account as disabled. If you do not select the 'Password never expires' box, users created using this method will be forced to change their password every 30 days (this does not apply to users created using the control panel method above).
Groups
Likewise, we can organise users into their respective groups - say for example into the administrator group which has full access to the computer. They can access all files and make changes that affect all users, such as installing new software or changing system settings. The Administrator account is a default member of this group.
Users: This is the default group new standard users will be assigned to. Members of this group can perform most common tasks like running applications and using printers, although they are not able to install any new programs or make similar changes to the system.
Remote Desktop Users: If you wish to be able to connect to the computer remotely, you will need to be a member of this group - so that you're account is registered to accept remote desktop requests. Remote desktop sessions cannot be created unless the account is a member. Note that this doesn't mean you can't use remote desktop on this machine, just that you can't connect to the account from elsewhere.
Guests: Any members of the Guests group do not have permanent profiles on the machine. Each time they log in a new profile is created for them and at log off the profile is deleted. The Guest account is a default member of this group.
Creating a Group
To create a new group we need to revisit the management console. You can get there by heading to the start menu, typing lusrmgr.msc and clicking the link when it appears.
Creating a new group is as easy as right clicking on the Groups folder and selecting 'New Group'. You'll be prompted to enter a name and description for the group, and to add any users, although only the name is mandatory at this stage.
Once the group is created you can then begin to add users and use it to manage permissions, which will be covered shortly.
User Account Control
User Account Control (UAC) was introduced by Microsoft in an attempt to make the Windows Operating System more secure. UAC works by assigning 'tokens' to the user when they log in. All users, whether they have a standard or administrative account, will have a token corresponding to their groups "power", which will be used to run that application with that level of access. If the permissions on the token match those of the task then it will be a success.
When an administrator wants to make changes to the system the screen is dimmed and a prompt is shown asking them to verify the request. If this is accepted a special administrative token is released and used to run the application with all the powers that come with being an administrator. The tokens, and the permissions that are associated with them, are only valid as long as the application is running and a new request is required next time the access is needed. This last bit is done automatically, generating a token for you to use and then relinquish next time...
Remember this a prompt for users, but if you are part of the admin group then you can disable the prompt and your request will always go through. But you may see quite a few of these:

And if you are a user outside the admin group - you will need an admin password

Before the application can run with administrative access, an administrator is required to enter their username and password. This is because a standard user does not have the administrative token to pass to the application. Usually an admin who is working within such accounts then has the option of being able to perform their functions as normal, just with one additional hurdle.
UAC Levels
You can configure UAC to be more, or less, permissive. If you search 'UAC' on the start menu and select 'Change User Account Control Settings' you will be presented with four options.
The options, and what they mean for UAC are:
- Always notify: The UAC prompt is shown when apps try to install software or make changes to your computer and when you try to change Windows settings. The desktop is dimmed when a UAC prompt is shown.
- Notify me only when apps try to make changes to my computer: This is the default setting for UAC. UAC prompts aren't shown when you try to make changes to Windows settings, but are shown when attempting to install software or run as administrator. The desktop is dimmed when a UAC prompt is shown.
- Notify me only when apps try to make changes to my computer (do not dim my desktop): This is the same as above but the desktop isn't dimmed when a UAC prompt is shown.
- Never notify: This is the equivalent of turning off UAC. Although UAC will still be active, all requests from administrators will be automatically approved while requests from standard users will be denied without showing a prompt in either case.
File Permissions
Windows has a very granular permissions system for files and folders. To manage this each file or folder has an Access Control List (ACL) which stores who is allowed which level of access. To access this list you need to right click the file and select 'Properties', then once the new window opens head to the Security tab, which will look like this:
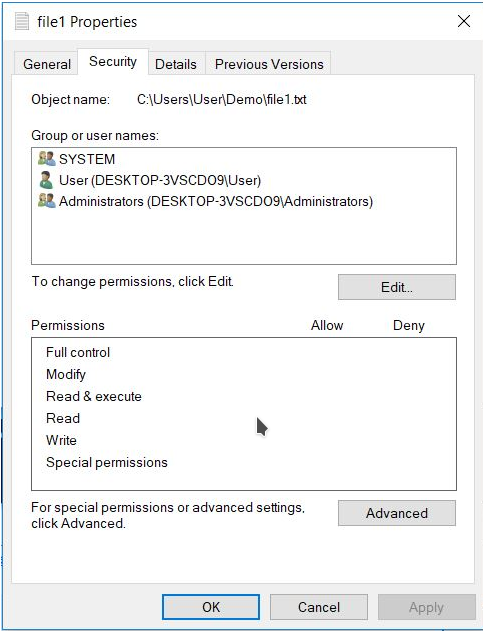
At the top of the window we can see a list of users or groups that have been added to the ACL for this file. Selecting one of the items from this list will populate the bottom section with their permissions. You can also edit the users or groups in the ACL by hitting the edit button and then when the screen below is displayed, adding or removing to the list.
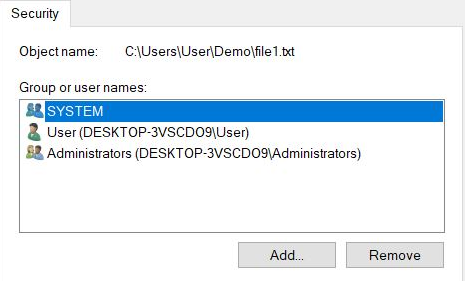
All permissions can either be allowed or denied. It's worth mentioning that a deny will always override an allow. For example if a user is a member of a group that is allowed to access a file, and also a member of another which is not, they will always be denied access. It's worth noting that the default action when a user does not have permissions set is to deny all.
The permissions available for files and folders are broadly the same. For files you are able to set the following permissions:
- Full Control: gives you all available permissions for the file.
- Modify: allows you to read, write, modify and execute the file. This doesn't mean you can take ownership of the file , being the main difference between the first option.
- Read & Execute: allows you to display the file's contents, and run the file if it's a program.
- Read: allows you to open the file, and view its contents.
- Write: allows you to write data to the file.
Similarly for folders, these are the options you have at your disposal:
- Full Control: gives you all available permissions for the folder and its contents.
- Modify: allows you to read, write, modify, and execute files in the folder.
- Read & Execute: allows you to display the folder's contents, the contents of files inside, and run any programs in the folder.
- List Folder Contents: allows you to display the folder's contents, and the contents of files inside.
- Read: allows you to open the folder, and view any files or subfolders.
- Write: allows you to add new files or subfolders.
You might notice there's some overlap there. That's because you need both Read & Execute and List Folder Contents to execute files within a folder. This is because files within a folder inherit their permissions from the folder, and files can't have the List Folder Contents permission, so must inherit Read & Execute.
Command Prompt : Networking
Much like we have ifconfig and ip in Linux you have the ipconfig in Windows - which allows you to check all the different IP-layer interfaces, all connections and the ability to modify those listed
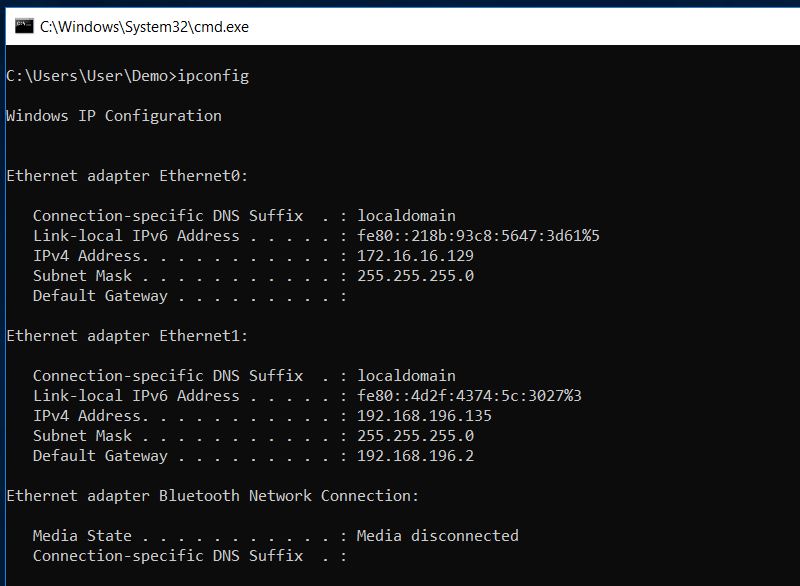
You may encounter a situation where you are not given an IP address on a network, this could be because the network does not automatically assign them, or possibly there's a fault. In any case, you're going to need an IP to communicate on the network.
We can achieve this from the command line by using the 'netsh' utility. The 'netsh' command is used to start Network Shell, which can then be used to manage the network settings of either the local, or a remote, computer.
To set the IP of a machine, you would run the following command in an administrative Command Prompt (the change affects all users, so that's an admin task):
netsh interface ip set address <connection name> static <IP> <subnet> <gateway>
This looks quite daunting at first, but you'll get the hang of it. Here's what the command will look like:
C:\Windows\system32> netsh ip set address "Ethernet0" static 172.16.16.150 255.255.255.0 172.16.16.1
C:\Windows\system32>
And you can run ipconfig again to see the changes
Accessing network resources
Now that we've seen how to manage the interface on your machine, you may want to access files stored on the network. We can mount shared folders by using the 'net' command. This command is used to manage almost all aspects of a network and its settings including shares, print jobs and users. Run net /? for a list of all the commands possible.
To mount a network drive you need to use net use, and you'll need to use this any time you want to view mounted shares, add a new share or manage existing ones. We're going to execute the following command:
net use x: \\DESKTOP-3VSCDO9\Share
This will mount the share on the named machine, to our X: drive. We can then navigate to the X: drive.
To remove the mounted drive we use the /delete switch like so:
net use x: /delete
This will remove the shared folder from your machine and release the X: drive letter to be used for something else.
Working with Users
The net command also works with users, instead of demarcating use to reference drives we can add the user command to reference the local users instead. We can list all users just by doing:
net user

;; Note you will need an account of administrative privilege if you are to add or delete
;; users.
Adding a new user is as simple as running:
net user /add <username> <password>
This command will create a new user and set the password to what you specified. You can also use * in place of a password and you will be prompted to enter the password on a new line (where it will not be displayed, which is good).
Your new user account is now available to be logged in to for the first time using the password you set during creation. You can do so much more when creating users this way, such as configuring account expiry and setting times where the account can log on. Check out net user /? for a full list of options.
The 'net' utility is also where you go to manage the groups a user is a member of. To do this you will need to use net localgroup. When you create a new user, by default they are just a standard user, so to gain higher privileges they need to be added to the Administrators group.
To check current group membership run:
net user <username>
This will print details about that account like below.

Looking towards the bottom of the output you can see the user is currently only a member of the Users group. To add them to the Administrators group you need to run:
net localgroup Adminstrators /add user3
As with all previous commands, running net localgroup /? will get you more details on possible options when managing group membership this way.
Core Windows Processes
With this guide I hope to train fledgling Windows Admins, and for you to spot threats, destroy malicious attacks we need to know what the stable image looks like. What does the day-to-day system look like, obviously presupposing this is that we have done our best to harden the system, putting logs on each endpoint etc - so we can determine daily usage patterns.
Task Manager
This is a built-in GUI-based Windows utility that allows users to see what is running on the Windows system. It also provides information on resource usage, such as how much CPU and memory are utilized by each process. When a program is not responding, Task Manager is used to end (kill) the process.
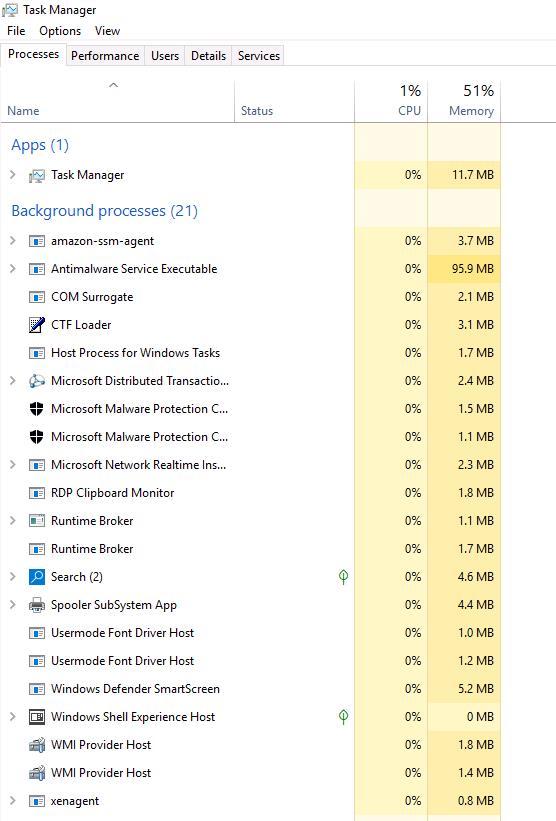
The information is quite sparse, by default it only gives you a couple columns of information , Name, Status, CPU, and Memory, are the only ones visible. To view more columns, right-click on any of the column headers to open more options.
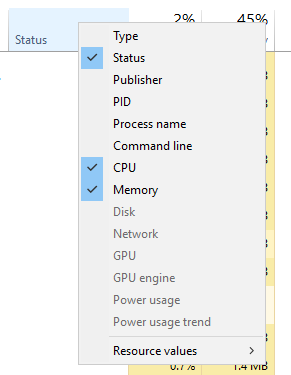
Being that this is a virtual machine it explains why already so much of the memory has been depleted ... But as you can see on the tabs there are:
- Processes.
- Performance. Shows a graph of CPU Performance.
- Users. Will give a table of each active user and their respective usage.
- Details. Instead of resource usage etc in the processes display, we see more program-relevant information, such as the User behind the process, the process ID ...
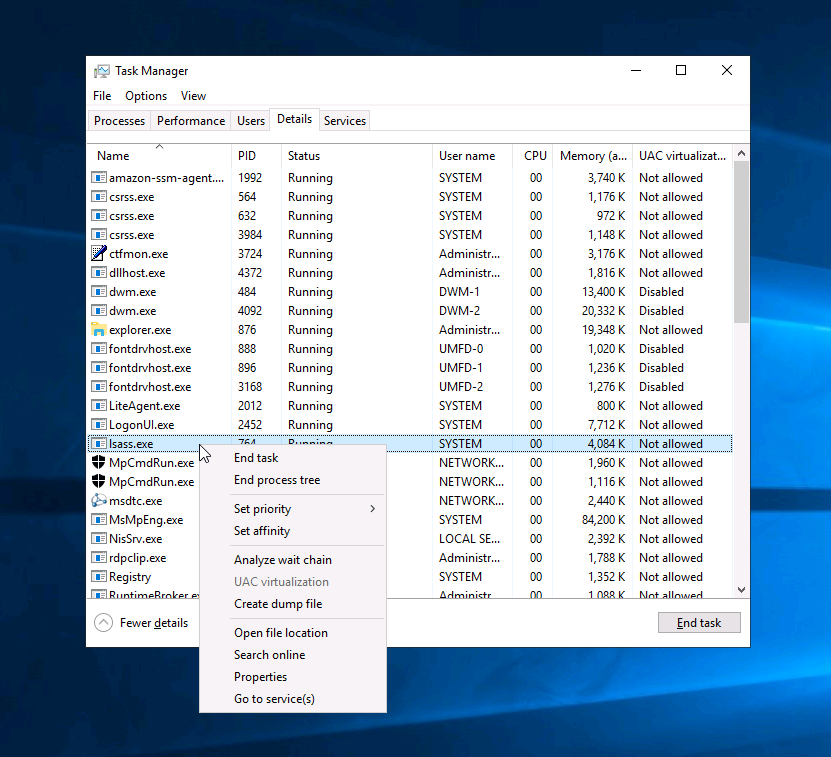
- Services.
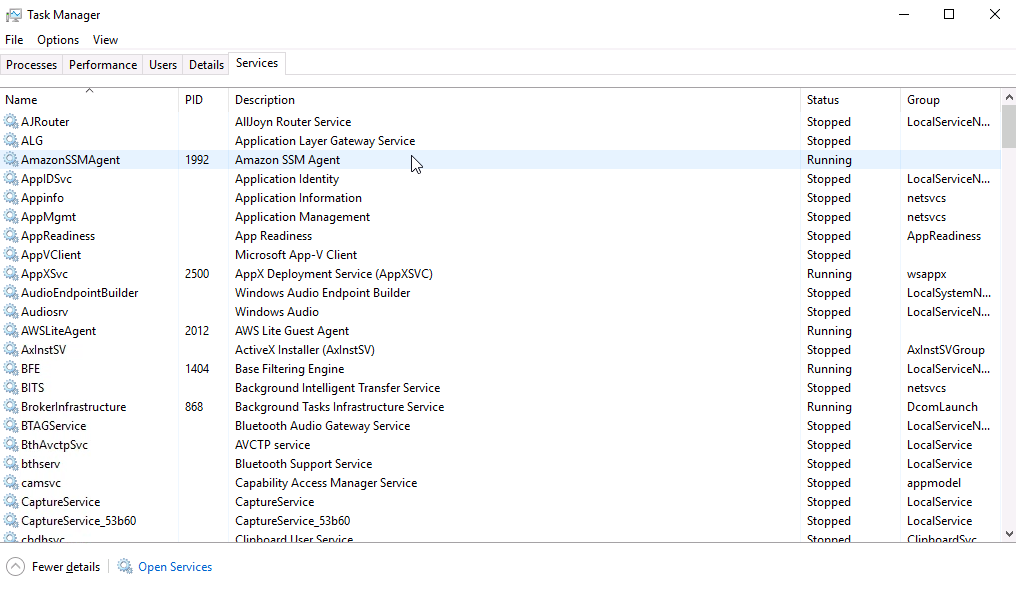
As we can only the process ID of the job itself, and we're not seeing the ID of the parent it can look a bit odd in places:
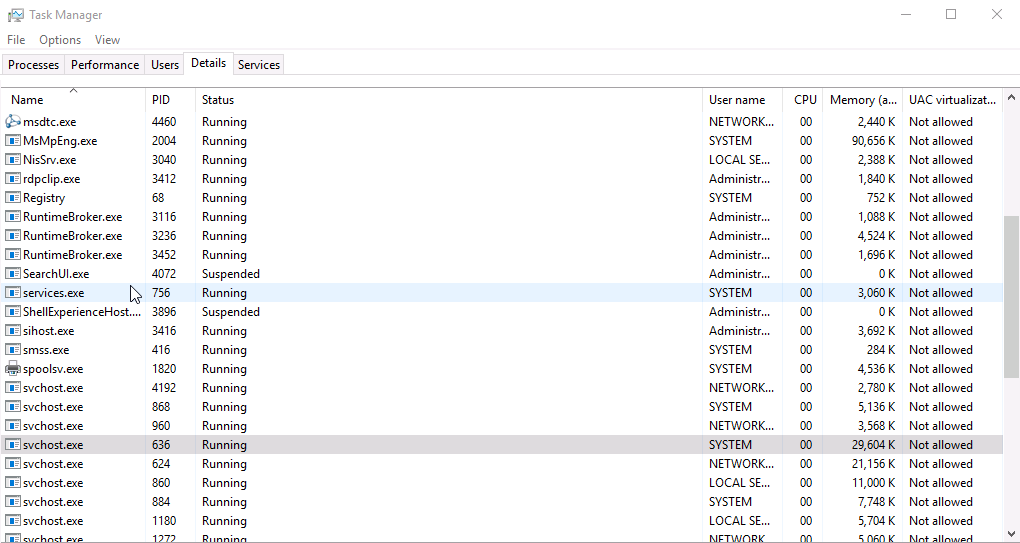
The services.exe program file is a part of the Microsoft Windows Operating System which manages the operation of starting and stopping services - so how has the service svchost.exe started first ? Well, it didn't. The first thing to note is that process ID assignments aren't linear, as during startup many processes started - got their PID - and then stopped and closed, freeing up that number to be used by another later process. This explains why svhost.exe could have started earlier, another thing to note with Task Manager is that the Parent Process ID isn't listed so the "process tree" can't be reasoned with - but with the use of other tools we can get a better idea of how the system starts up:
Using Process Hacker
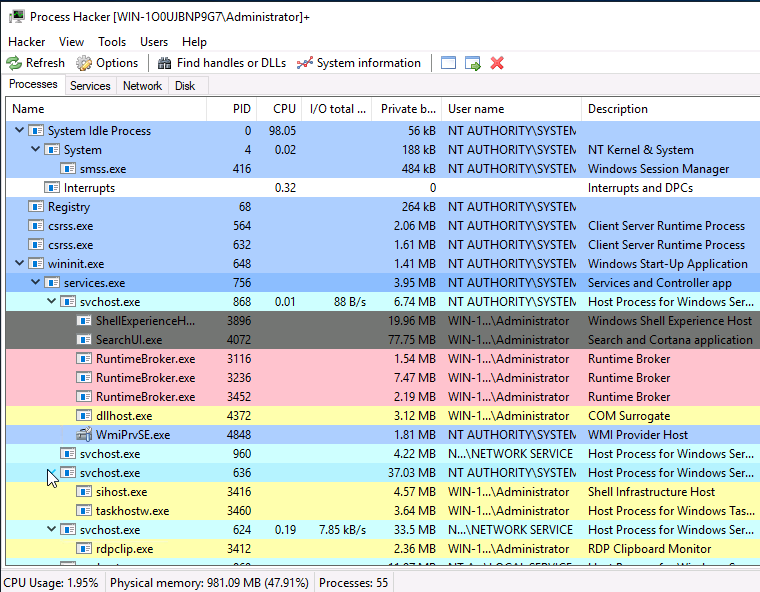
Now we can see that svchost is a derivative of services.exe.
The Entire Windows Process , from the first job
Now, this eye-catching title is a tad misleading as I'm not going to go from PID 0 as the first couple processes 0,1,2,3 are all fundamental kernel threads which are no different and are responsible for the most basic functions to get the OS off the ground. The first one we can look at is called System and as we can see from the image above that has PID 4. The official definition from Windows Internals 6th Edition:
"The System process (process ID 4) is the home for a special kind of thread that runs only in kernel mode a kernel-mode system thread. System threads have all the attributes and contexts of regular user-mode threads (such as a hardware context, priority, and so on) but are different in that they run only in kernel-mode executing code loaded in system space, whether that is in Ntoskrnl.exe or in any other loaded device driver. In addition, system threads don't have a user process address space and hence must allocate any dynamic storage from operating system memory heaps, such as a paged or nonpaged pool."
So essentially the system process is responsible for the system memory and compressed memory in the NT kernel. This system process is a single thread running on each processor. It is the host of all kind of drivers (network, disk, USB). The related file name is C:\Windows\System32\ntoskrnl.exe. The system process in Windows 10 has an additional task, it is compressing old pages of memory so that you have more free memory to use. That's why this process may use a lot of memory.
smss.exe
The next process is smss.exe (Session Manager Subsystem). This process, also known as the Windows Session Manager, is responsible for creating new sessions. It operates in kernel space but it is also the first program to be loaded into user space by the kernel - which makes sense as now our applications can communicate and request new sessions or delete others etc...
Don't get it wrong, this is still super low-level stuff as we have only just started up the kernel mode and user mode of the Windows Subsystem (the environment which mediates control between high-level software and hardware). As smss.exe first executes it runs a couple programs that are necessary for system-wide function:
win32k.sys. It contains the console as well as text window support, shutdown and hard-error handling for all other environment subsystems.winsrv.dll. This is , like all otherdll's a crucial instrument that.exefiles rely on as they contain the procedures and machine code that talk to the computer. This guide explains how essential this file is to start up.csrss.exe. As mentioned in the previous section,csrss.exe(Client Server Runtime Process) is the user-mode side of the Windows subsystem. This process is always running and is critical to system operation. If by chance this process is terminated it will result in system failure. This process is responsible for theWin32console window and process thread creation and deletion. For each instancecsrsrv.dll,basesrv.dll, andwinsrv.dllare loaded (along with others). This process is also responsible for making the Windows API available to other processes, mapping drive letters, and handling the Windows shutdown process. You can read more about this process here.
Once the subsystem is established and the respective spaces demarcated, it can begin to create session 0 - a kernel mode session , and session 1 - a user-side session. For both sessions, regardless of side , the csrss.exe (Client Server Runtime Subsystem) is started , which is essentially a program that handles thread creation and deletion , alongside console window creation and deletion. Whenever this program is run, csrsrv.dll, basesrv.dll, and winsrv.dll are subsequently loaded as a result.
smss.exe needs to be executed whenever a new session is instantiated. The first child instance, session 0 will create child instances in new sessions - to be within the same session would be creating threads, hence where csrss.exe comes in handy. New sessions are made by smss.exe copying itself into the new session and self-terminating, making sure the above three programs are loaded and the session is "usable". You can read more about this process here.
For those first two sessions,
- Session 0:
- Alongside
csrss.exe,wininit.exeis the last bit of the puzzle for now. This program is , as the name sounds, responsible for initialising Windows - it's a launcher for most background system applications that are consistently running. It is a critical Windows process for the operating system to function properly, and removing it may cause system errors. Additionally, it creates the%windir%\tempfolder, startsLsm.exe(Local Session Manager), createsServices.exe(Service Control Manager or SCM) and a window station (Winsta0). More on this here.
- Alongside
- Session 1:
- Alongside
csrss.exe,winlogon.exeis needed here as it allows users to access the system. This process performs a variety of critical tasks related to the Windows sign-in process. For example, when you sign in, thewinlogon.exeprocess is responsible for loading your user profile into the registry. This allows programs to use the keys underHKEY_CURRENT_USER, which are different for each Windows user account.
- Alongside
Aside from all this, since smss.exe is all about sessions, it has to make sure it creates the right "environment" and takes care of all processes outside the scope of normal programs. What I mean is, when an application is given memory to exist, it doesn't need to know about how the virtual memory was paged together , how the environment variables got there - just that they are there !
What would be unusual for smss.exe ?
- A different parent process other than System(4)
- Image path is different from
C:\Windows\System32 - More than 1 running process. (children self-terminate and exit after each new session)
- User is not
SYSTEM - Unexpected registry entries for Subsystem
wininit.exe
Going into this program in a bit more detail now, as it takes quite a bit to really initialise Windows. Especially if you want it to be a secure system. Moreover , things like lsass.exe are loaded here - lsass.exe is the Local Security Authentication Server. It verifies the validity of user logons to your PC or server. Lsass generates the process responsible for authenticating users for the Winlogon service. This is performed by using authentication packages such as the default, Msgina.dll. If authentication is successful, Lsass generates the user's access token, which is used to launch the initial shell. Other processes that the user initiates then inherit this token.
It also loads services.exe (Service Control Manager) , along with lsaiso.exe all within Session 0.
Note: lsaiso.exe is a process associated with Credential Guard and Key Guard. You will only see this process if Credential Guard is enabled.
wininit.exe => services.exe
The Service Control Manager (SCM), has a pretty straightforward role - to handle system services: loading services, interacting with services, starting/ending services, etc. It maintains a database that can be queried using a Windows built-in utility, sc.exe.
Programs like winlogon.exe rely on this program being started up early, and other services that get started by the SCM are invaluable to everyday jobs - we can see all the services by going to
Information regarding services is stored in the registry, HKLM\System\CurrentControlSet\Services.
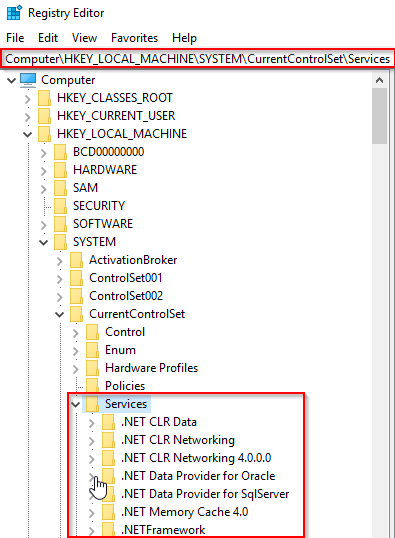
This process also loads device drivers marked as auto-start into memory.
When a user logs into a machine successfully (wininit + services + lsass + winlogon to make this happen), this process is responsible for setting the value of the Last Known Good control set (Last Known Good Configuration), HKLM\System\Select\LastKnownGood, to that of the CurrentControlSet.
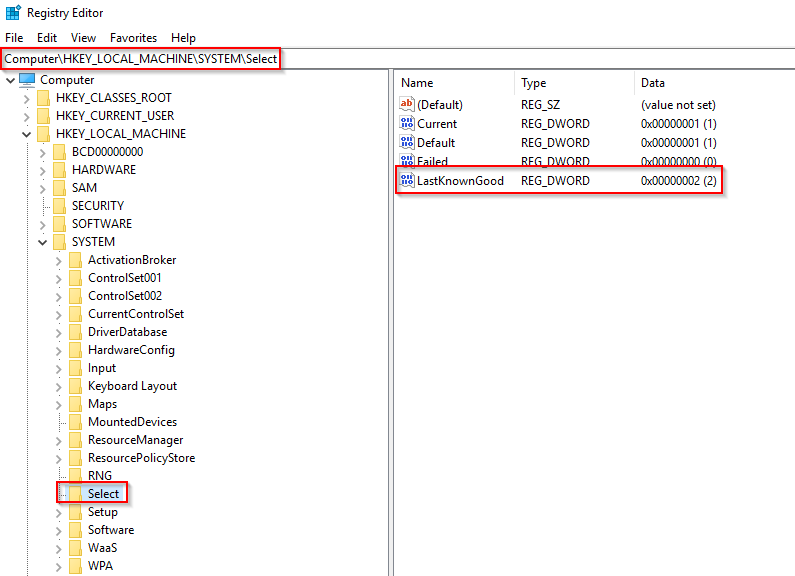
As services.exe is loaded at the point where the system is starting to mature, it sits on the shoulders of an almost complete system - all that's left is for the many processes to come that hook onto it. And there are many...
It's parent to
svchost.exespoolsv.exemsmpeng.exedllhost.exe
To name a few. You can read more about this process here.
Characteristics:
- Image Path:
%SystemRoot%\System32\services.exe - Parent Process:
wininit.exe - Number of Instances: One, as it was started in session 0 and should be the only one of its kind due to the kernel not being a process which should be created more than once. The point is to serve as parent and manager of process, aided in part by things like
svchost.exewhich we shall examine next. - User Account: Local System
- Start Time: Within seconds of boot time
What is unusual?
- A parent process other than
wininit.exe - Image file path other than
C:\Windows\System32 - Subtle misspellings to hide rogue process in plain sight
- Multiple running instances
- Not running as SYSTEM
wininit.exe => services.exe => svchost.exe
Right then, onto the next bit.
At this point we've learned how the OS starts up and gets into a position to create new sessions, initiates the Service Control Manager and now we need a way to get those individual services to call system libraries (dll) files in a safe manner - as they are effectively interacting with low-level binaries, and for all these services that do start they shouldn't need the code to call those binaries themselves - as the locations, names and behaviour may change. Moreover we need a wrapper , which encoats the application and acts as the shell for loading the needed dll's. This is where Service Host (svchost.exe) comes in, this program is called every time an application needs hosting - so quite often. In tandem with the services.exe they manage all these processes , and because Windows does have so many services running such management is vital to sustaining a wide array of complex functionality.
I skimmed over a bit of the registry earlier - about Current Control Sets , which are all the configurations of device drivers and needed services and this is all kept in the registry , in the form:
HKLM\SYSTEM\CurrentControlSet\Services\SERVICE_NAME\Parameters
The registry stores all the DLL's every service will need and under each SERVICE_NAME folder will be the parameters folder - inside keeping the reference to the DLL it needs. Due to the modularity of services they often require only one, and this keeps services lightweight, and the chain is easier to manage and understand.
svchost.exe can be called many times and be the wrapper for many different services as we see here
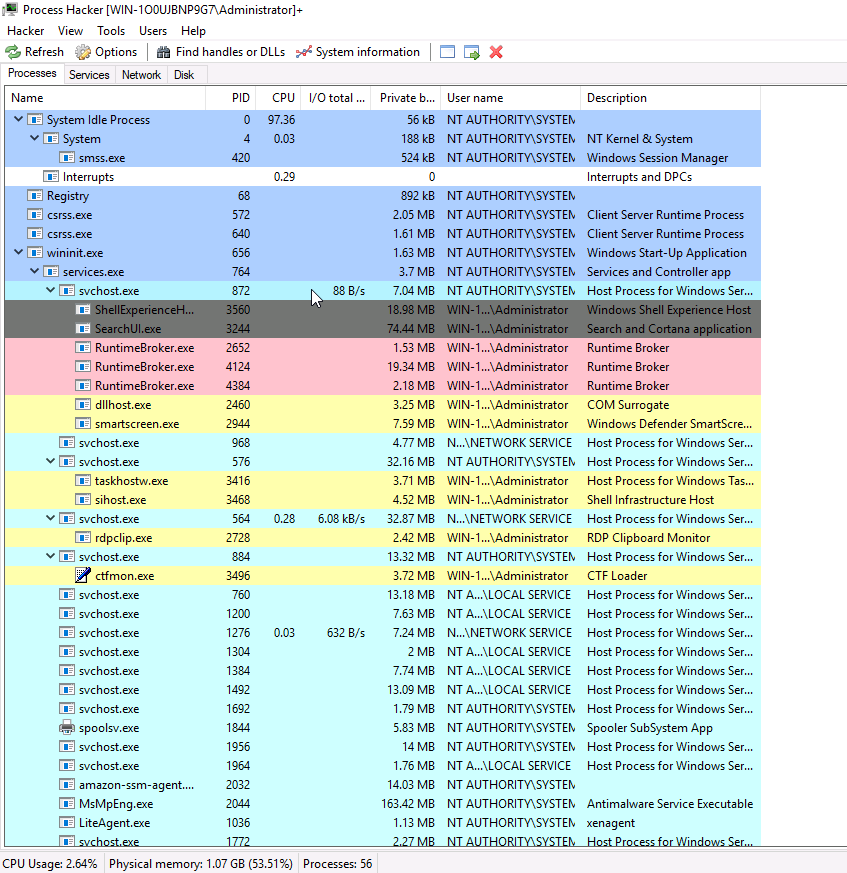
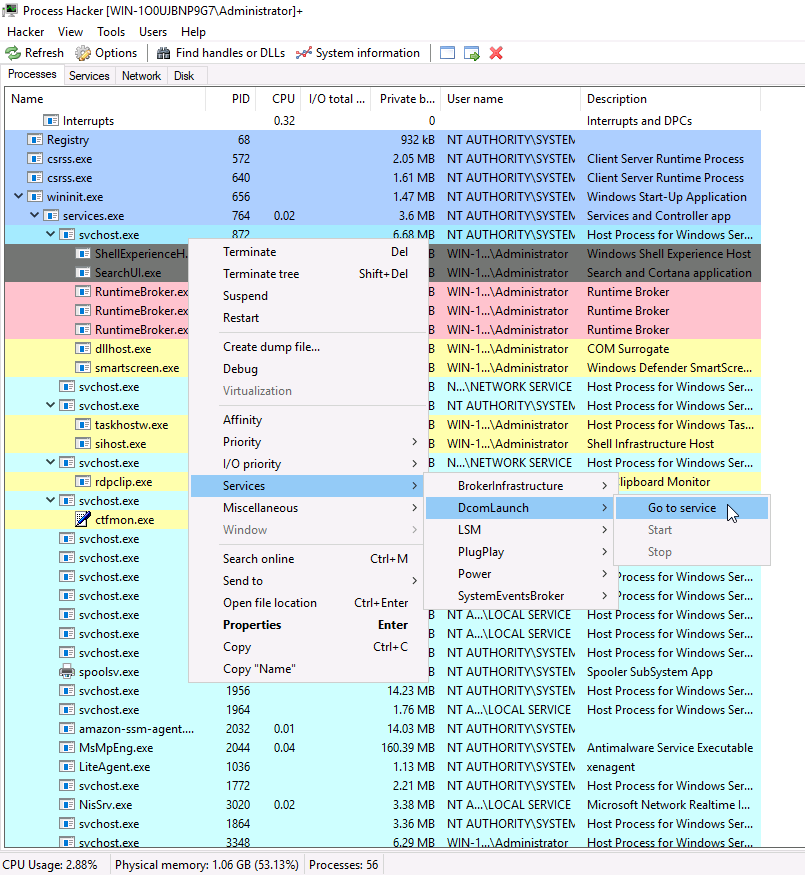
Right clicking one of the svchost.exe instances and hovering over services will show what that instance is currently managing. Clicking on the PID 872 instance:
Right-clicking on the properties of DcomLaunch will show us the service DLL's it requires:
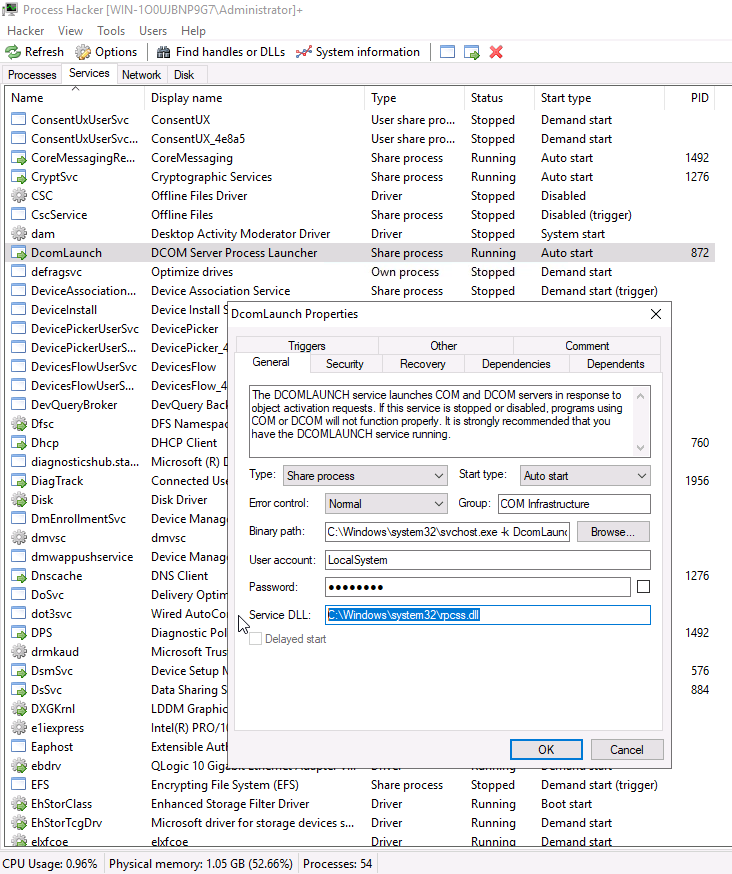
You can see in the Binary Path how the svchost.exe wrapper is used to launch the service in a modular way and the hosting can be done succinctly.
There is a key identifier in the binary path. That identifier is -k . This is how a legitimate svchost.exe process is called.
The -k parameter is for grouping similar services to share the same process. This concept was based on the OS design and implemented to reduce resource consumption. Starting from Windows 10 Version 1703 services grouped into host processes changed. On machines running more than 3.5 GB of memory, each service will run its own process. You can read more about this process here.
So that group of services I highlighted earlier all have the same Parent PID.
Since svchost.exe will always have multiple running processes on any Windows system, this process has been a target for malicious use. Adversaries create malware to masquerade as this process and try to hide amongst the legitimate svchost.exe processes. They can name the malware svchost.exe or misspell it slightly, such as scvhost.exe. By doing so the intention is to go under the radar. Another tactic is to install/call a malicious service (DLL).
Extra reading on this - Hexacorn Blog
Characteristics:
Image Path: %SystemRoot%\System32\svchost.exe
Parent Process: services.exe
Number of Instances: Many
User Account: Varies (SYSTEM, Network Service, Local Service) depending on the svchost.exe instance. In Windows 10 some instances can run as the logged-in user.
Start Time: Typically within seconds of boot time. Other instances can be started after boot
What is unusual?
- A parent process other than
services.exe, as it's basically the workmen of the Services Control Manager. - Image file path other than
C:\Windows\System32 - Subtle misspellings to hide rogue process in plain sight
- The absence of the -k parameter
lsass.exe
Right then, moving away from all the technicalities on services, we'll go back and visit the functionality behind the Local Security Authority Subsystem Service (LSASS) - which is responsible for enforcing the security policy on the system. It verifies users logging on to a Windows computer or server, handles password changes, and creates access tokens. It also writes to the Windows Security Log. So it works in tandem with things like winlogon.exe - when you sign in for example, winlogon.exe is responsible for loading your user profile into the registry. This allows programs to use the keys under HKEY_CURRENT_USER, which are different for each Windows user account. Only triggered when you successfully sign in - authenticated by LSASS.
It creates security tokens for SAM (Security Account Manager), AD (Active Directory), and NETLOGON. It uses authentication packages specified in HKLM\System\CurrentControlSet\Control\Lsa.
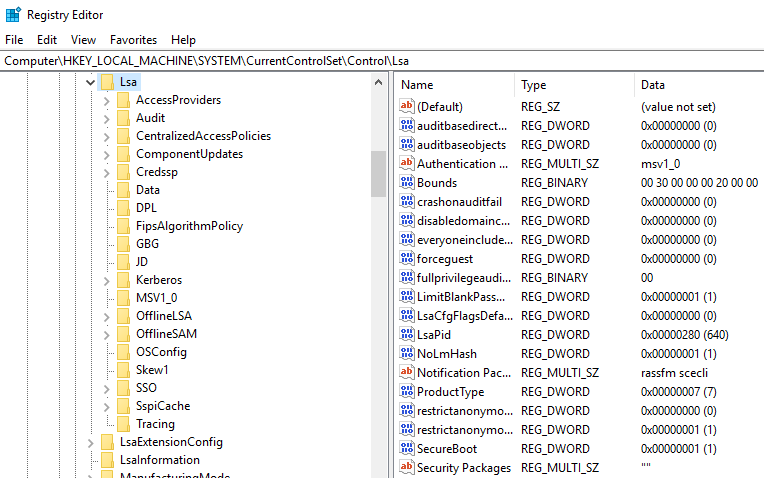
This is another process adversaries target. Common tools such as mimikatz is used to dump credentials or they mimic this process to hide in plain sight. Again, they do this by either naming their malware by this process name or simply misspelling the malware slightly.
Extra reading: How LSASS is maliciously used and additional features that Microsoft has put into place to prevent these attacks. (here)
Characteristics:
- Image Path:
%SystemRoot%\System32\lsass.exe - Parent Process:
wininit.exe. Remember way back I mentioned that itwininit.exealso startsservices.exe, these two combine to load programs that are both functional and secure, with the knowledge that they were approved by LSASS. - Number of Instances: One
- User Account: Local System
- Start Time: Within seconds of boot time
What is unusual?
- A parent process other than
wininit.exe - Image file path other than
C:\Windows\System32 - Subtle misspellings to hide rogue process in plain sight
- Multiple running instances
- Not running as SYSTEM
winlogon.exe
Going back again to when smss.exe created two main sessions, and winlogon.exe was created by that program in the user-space to deal with - what's formally called - the Secure Attention Sequence (SAS). This is the ALT+CTRL+DELETE key combination users press to enter their username & password. Also, the job of loading the user profile. This is done by loading the user's NTUSER.DAT into HKCU and via userinit.exe loads the user's shell. Read more about this process here?redirectedfrom=MSDN).

Because it's started by smss.exe we know that it creates the process and then closes in on itself - meaning winlogon has no discernible parent process...
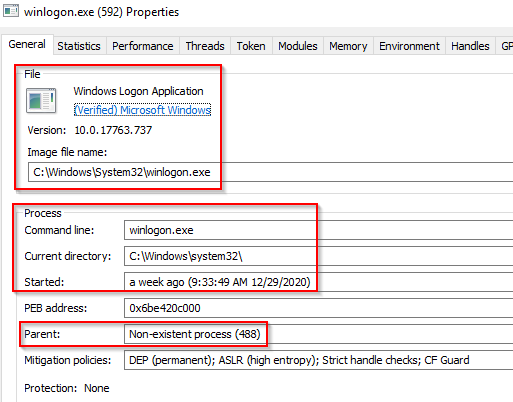
Characteristics:
- Image Path:
%SystemRoot%\System32\winlogon.exe - Parent Process: Created by an instance of
smss.exethat exits, so analysis tools usually do not provide the parent process name. - Number of Instances: One or more
- User Account: Local System
- Start Time: Within seconds of boot time for the first instance (for Session 1). Additional instances occur as new sessions are created, typically through Remote Desktop or Fast User Switching logons
What is unusual?
- An actual parent process. (
smss.execalls this process and self-terminates) - Image file path other than
C:\Windows\System32 - Subtle misspellings to hide rogue process in plain sight
- Not running as SYSTEM
- Shell value in the registry other than
explorer.exe
explorer.exe
This is the last one of the main processes we'll be covering in this section !
The last process we'll look at is the Windows Explorer, explorer.exe. This is the process that gives the user access to their folders and files. It also provides functionality to other features such as the Start Menu, Taskbar, etc.
As mentioned previously, the Winlogon process runs userinit.exe, which launches the value in HKLM\Software\Microsoft\Windows NT\CurrentVersion\Winlogon\Shell. userinit.exe exits after spawning explorer.exe, as the Taskbar , Start Menu functionality for the user has been initialised and hence userinit.exe as a parent is no longer needed (the parent shutting down doesn't close explorer).
There will be many child processes for explorer.exe.

Characteristics:
- Image Path:
%SystemRoot%\explorer.exe - Parent Process: Created by
userinit.exeand exits - Number of Instances: One or more per interactively logged-in user
- User Account: Logged-in user(s)
- Start Time: First instance when the first interactive user logon session begins
What is unusual?
- An actual parent process. (
userinit.execalls this process and exits) - Image file path other than
C:\Windows - Running as an unknown user
- Subtle misspellings to hide rogue process in plain sight
- Outbound TCP/IP connections
Other resources
It is vital to understand how the Windows operating system functions as a defender. The Windows processes discussed in this room are core processes. Understanding how they operate normally can aid a defender to identify unusual activity on the endpoint.
With the introduction of Windows 10 additional processes have been added to the list of core processes to know and understand normal behaviour.
Earlier it was mentioned that if Credential Guard is enabled on the endpoint an additional process will be running, which will be a child process to wininit.exe, and that process is lsaiso.exe. This process works in conjunction with lsass.exe to enhance password protection on the endpoint.
Other processes with Windows 10 is RuntimeBroker.exe and taskhostw.exe (formerly taskhost.exe and taskhostex.exe). Please research these processes and any other processes you might be curious about to understand their purpose and their normal functionality.
The information for this room was derived from multiple sources.
- https://www.threathunting.se/tag/windows-process/
- https://www.sans.org/security-resources/posters/hunt-evil/165/download
- https://docs.microsoft.com/en-us/sysinternals/resources/windows-internals